In the Occupational Health menu, click Appointments.
Change the view if necessary to display the desired date. All of the views, except Month, show each hour divided into the time slots as defined in your Appointment Settings (see Setting Up the Calendar).Note that changing the slot duration only affects the display — you can schedule an activity for any period of time.
Optionally, filter the schedule to only show the desired Scheduling User’s appointments (see Choosing Which Appointments to View).
Click New above the calendar and choose Appointment, or click in the time slot where you want to add the appointment (or click and drag to create an appointment block; note that the start time will round down so you don’t have to be exact).

To copy an existing appointment, open the appointment and choose Actions»Copy, choose the employee name, and change any of the other details as required.
If you created the appointment on the Master view by clicking in a timeslot, the Scheduling User defaults to the scheduling user for that row.
If you created the appointment on the Master view by clicking New, or if you created the appointment on any other view, the Scheduling User defaults to the Default Practitioner in My Settings. If a Default Practitioner is not defined in My Settings, the Scheduling User will be blank.
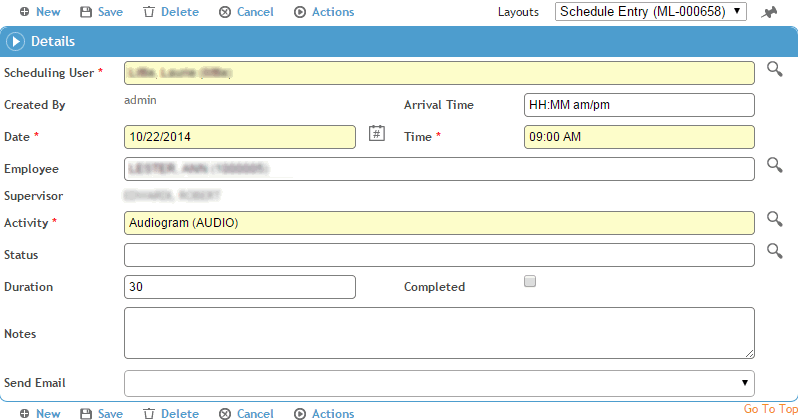
Enter data in the fields of the Schedule Entry form. The fields are self-explanatory, but note that:
-
The appointment Time defaults to the time slot you clicked to add the appointment, but you can change this. If you created the appointment on the Month view, you must enter the appointment Time.
-
If the Duration is not populated based on the selected Activity, it defaults to the schedule’s Slot Duration, but you can change this.
-
When a scheduling user who is not a practitioner opens the Activity list, it will be limited to activities marked (in the ScheduleActivity look-up table) as Non-Medical Activity and whose Type is not “Exam Activity Only”.
An Additional Activities section may be added to a custom layout; this section allows you to schedule multiple activities in the same appointment. The Duration will display the total of all selected activities. If the scheduled activity is linked to an SEG, the SEG’s recall activities are listed here (but you can add or delete any as required).
-
The Status field indicates whether the employee for whom the activity was scheduled failed to arrive (no show), arrived or rescheduled.
-
If the test was completed on the scheduled date in an external module, e.g. an audiogram was marked as complete in the Audiometric Testing module, the Completed check box is automatically selected.
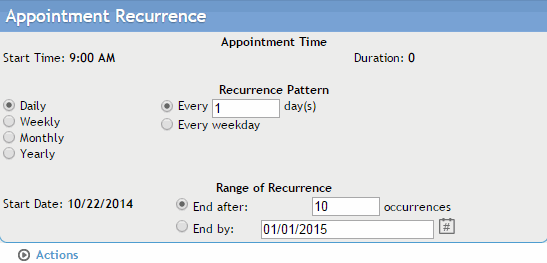
To set this appointment up as a recurring appointment for the same patient and activity, choose Actions»Recurrence (this button appears when you save data).

-
Select the frequency of occurrence - Daily, Weekly, Monthly, or Yearly. The pattern options will change depending on the frequency option selected. To clear your settings, choose Actions»Return to Default Settings.
-
Specify how long the recurring appointments should last (either a specific number of occurrences, or an end date).
-
When you are finished, choose Actions»Create Recurrence Appointments. The recurring appointments will appear in the schedule according to the frequency pattern specified.
To send an email notification about this appointment, in the Send Email field select “Including Activity and Notes” or “Including Activity as Clinic Visit and Excluding Notes” if you want to omit the reason. Three new check boxes appear, allowing you to indicate who should receive the email (the Scheduling User, Employee, and/or Supervisor). The email(s) are sent when the appointment is saved. If the appointment is part of a series, the recipient will only receive one email for the entire series. These notification emails are treated the same as regular meeting requests: the recipient(s) can accept the meeting (appointment) directly into their mail service (such as Outlook), or reject the request. To resend the email(s) later, or to send an email to a recipient who was not selected earlier, select the appropriate recipient(s), then choose the appropriate Send Email action from the Actions menu.
Email notifications are listed on the Tracking Status Log. For more information, see Monitoring Email Notifications below.
You can send a reminder letter instead of, or in addition to, an email notification or To Do list reminder: choose Actions»Generate Reminder Letter. For more information, see Generating a Letter.
Click Save.
If you selected yourself as the Scheduling User, and sent email To Scheduling User, the appointment is assigned a tracking status of “Self”. These can be viewed in the Tracking Status Log.
When scheduling recall activities such as a second immunization, you can link directly to modules that are associated with the recall activity. To link to an associated module, choose Actions»Link. A data entry form for the module you’re linking to opens. For example, if you select Immunization as the activity, the entry is linked to the Immunizations form. Activities and the modules they are linked to are defined in the ScheduleActivity look-up table.
 to view this log. The icon displays a red alert when there are new unread incoming messages. Once you open the log the alert disappears.