Generating a Questionnaire for
an Employee
Questionnaires are available in multiple modules.
Depending on your system settings, there may be a default questionnaire
specified for a module, or users may be allowed to create any questionnaire
(see Changing
Your System Settings).
If you have access to the Occupational Health suite, you
can send multiple questionnaires to a group of recipients, for SEG-related
or non-SEG-related purposes. For more information, see Sending
Questionnaires to Multiple Recipients.
A questionnaire can be generated via the Questionnaires
tab in a module record, or you can create a questionnaire for an employee
by clicking Questionnaire in each suite’s
menu. When a questionnaire is associated with an employee, the employee’s
supervisor is populated automatically.
When you choose Questionnaire in a suite’s menu, you will
only see the questionnaires for modules that you have security access
to. For example, if you do not have access to the Pulmonary module, the
Questionnaires list via the Occupational Health menu will not show any
Pulmonary questionnaires.
A questionnaire’s security is determined by its parent (e.g. the incident
it is attached to), so only users with security to see that parent record
can view the attached questionnaire. If a questionnaire is not attached
to a specific record (e.g. it was added at the suite level), then any
user can view it.
For medical questionnaires, security is determined by its parent (e.g.
the clinic visit it is attached to) OR the employee it is related to.
Only users with security to see that parent record (or that employee)
can view the attached questionnaire. If a medical questionnaire was added
at the suite level, security is determined by the employee the questionnaire
is related to.
From the Questionnaires
tab in a module record, click New.
or
From a suite’s menu, click Questionnaire.
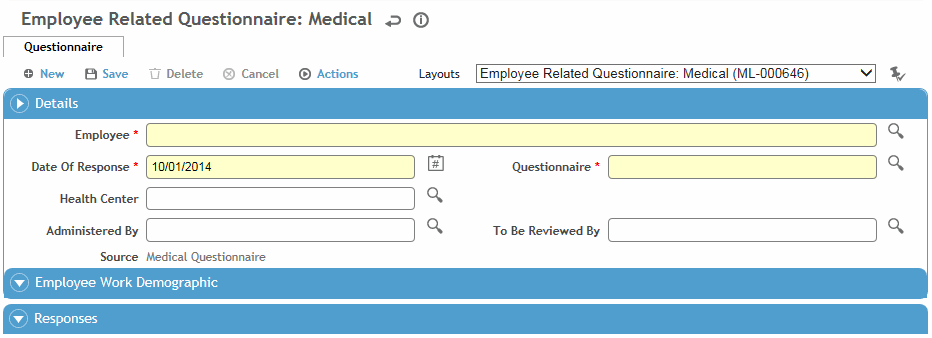
Click New, then select the appropriate Employee.
Change the Date of Response, if necessary, and select
the appropriate Questionnaire.
For Occupational
Health questionnaires, change the Health Center
if necessary.
Select the person(s)
who will be administering and reviewing the questionnaire.
Click Save. (The Classification fields and the Total
Score may be populated after responses are entered.)
Optionally,
for medical questionnaires only, you can create a note to be linked
to a clinic visit; choose Actions»Create Clinic
Visit Note. The note will only include questions which have
been configured to print notes (in the Questionnaire look-up
table).
On the note entry form, select which of the
employee's clinic visits the note is to be linked to.
When a question is added to a questionnaire
via the Questionnaire table,
the question can be configured to automatically display its response
along with a preceding or appending user-defined string in the clinic
visit note. The line in which this response appears in the note can
also be configured.
Click Save and Close.
The note will appear in the Notes tab of the specified clinic visit.
If any answers have been changed since the
note was generated, click Regenerate Note.
To administer the questionnaire:
If the employee is with you and will be answering
the questions immediately (online), see Entering
Responses to a Questionnaire.
If you are going to send the questionnaire
to the employee to complete:
To generate a questionnaire with all questions
and any responses and comments, choose Actions»Print.
This generates a PDF report that you can then print.
If you want to render the questionnaire with all
the questions and any responses and comments in the new Clarity theme
just as it appears in Cority,
choose Actions»Print HTML. Select if you want
to include the header and/or employee’s work demographics; these selections
will output exactly what is on screen. If you select Include
Attachments, any attachments will be listed on a separate tab,
ordered by created date and time. When you click Print the
questionnaire content will open in a new window where you can use the
browser’s print function.
Note This action is only available if your
application user interface theme is Clarity and the “Render Updated Questionnaire
Response in Clarity” system setting is enabled.
To generate a blank questionnaire with the
questions and all possible responses, choose Actions»Print
Blank. The questionnaire opens in a separate window, where
you can use the toolbar options to print it or send it as an email
attachment.
You can select multiple questionnaires to print at the
same time (Print or Print Blank).
