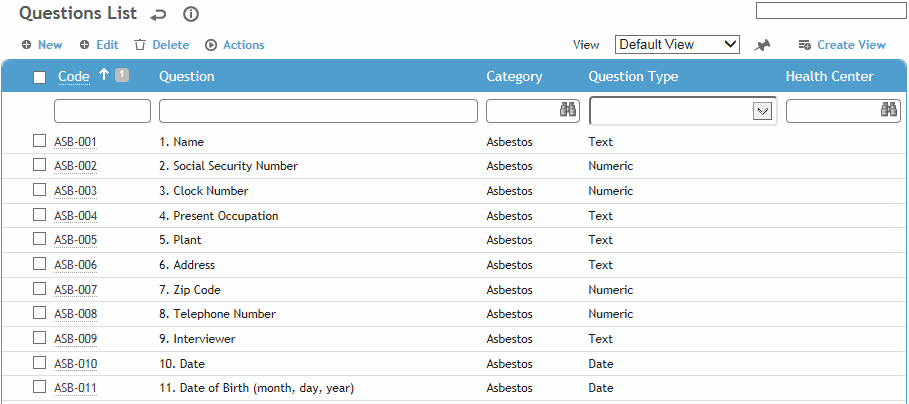
To filter the list of records, enter a few characters in one or more of the fields at the top followed by an asterisk, then press enter.

Click a link to open a question, or click New.

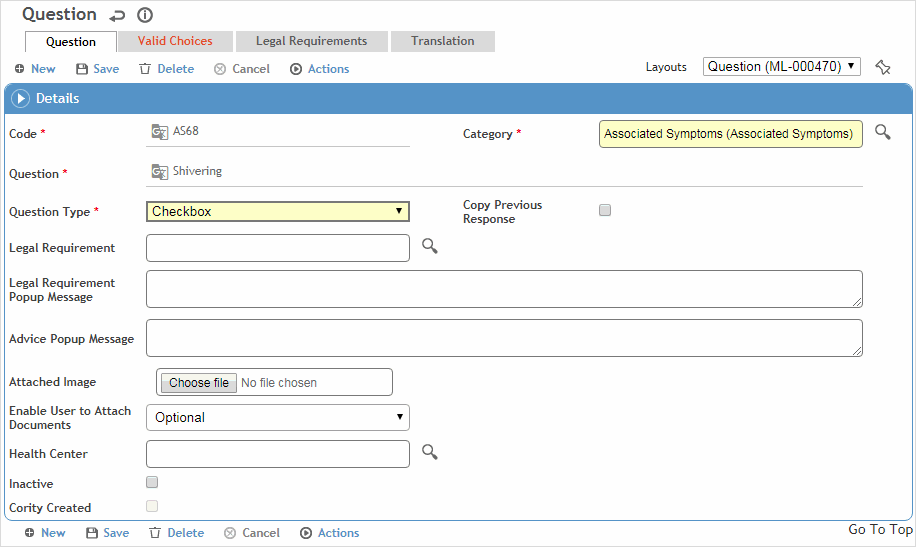
Enter a unique Code for the question. It may be helpful to prefix the code with a reference to the module the question will be used with, e.g. RESP-, or HEAR-, etc.
Select a Category to assign the question to.
In the Question field, enter the question. You can also use this field to enter instructions for respondents (select “Instruction” as the Question Type).
Select the Question Type. If you select:
Draw: This question type allows users to draw a response with a mouse (or their finger if using a touchscreen). Select the Draw Field Size. If the response will be included in a report, you should select either Small or Medium, or resize any image you upload accordingly. If you select Large, the entire response will be resized to medium in the report output. If you select Background Image, select an image that will appear in the background of the drawn response. The drawn response will appear on top of the image.
Optionally select an Attached Image that will appear when the user hovers the cursor over the question text.
For the Background Image and Attached Image fields, if you upload an oversized image, its width will be reduced to 600 pixels, and its height will be calculated based on the image’s aspect ratio.Formula: When you select this question type, the following text is inserted into the Question field: “(CALCULATION: select Action button, Calculate Score to continue)”. Edit the Question field to include a description in front of this text (e.g. “Arm and Wrist Analysis Score - sum of the scores for questions 10 and 11 (CALCULATION:...)”.
You define the formula when the question is inserted into a questionnaire (which questions are included, and the operator, e.g. <Q10>+<Q11>).
If you want scores within a particular range to generate a finding (with associated action), on the Score Range Classifications tab, configure the score ranges and select the appropriate Finding Type. Note that findings are only generated if the questionnaire is associated to an audit or inspection.
Multiple Choice, Multiple Choice Checkbox, Multiselect Checkbox, Normal or Abnormal: On the Valid Choices tab, click New and enter the Choice, a Description of the choice, any comments that you want to appear in Notes generated from the questionnaire, the Classification, Score, and Response # (i.e. position you want the choice to occupy in the list of choices: enter “1” if you want the choice to be first in the list, “2” if you want it to be second, etc.).
If you want the selection of this response to generate a finding (with associated action), select the Finding Type to be linked to this question. Note that findings are only generated if the questionnaire is associated to an audit or inspection.
Indicate if the questionnaire should be associated with a compliance applicability assessment if this response is selected.
If added to a custom layout, you may identify a choice as a Risk Factor. When the questionnaire is posted to a risk assessment record with this response, a new Task-Hazard-Controls entry will be created for the risk factor.
For Multiple Choice Checkbox questions, respondents
can only select one of the available choices. To allow respondents
to select multiple choices, use a Multiselect Checkbox type; the question
score will be the sum of all selected choices.
For Multiple Choice, Multiple Choice Checkbox or Multiselect Checkbox,
you must define the appropriate layout in the system settings.
In a completed questionnaire, responses to a Multiselect Checkbox question are separated by a semicolon, so you should take care to not use a semicolon in the choice text to avoid confusion. When the questionnaire is printed, each selection is shown on a separate line.
Numeric: The Low Range, High Range, and Units fields are enabled.
To define ranges of values for numeric test results, such as BMI and blood pressure, enter values on the Numerical Range Classifications tab. These ranges of values are used to determine the system classification for questionnaires.
If you choose to Use Response as Score, any values on the Numerical Range Classifications tab are ignored for score calculation. If a High Range is specified, that value is used when calculating the Total Possible Score. If a High Range value is not specified, the response value is used.Subquery: Select a subquery that contains the possible responses (e.g. a partial list of clinic visit reasons); the respondent will select a value from the subquery results. If the subquery is later updated, the values available will also be updated. The entity associated with the subquery is displayed; responses to this question will be mapped to this entity's fields, and may therefore create one or more records.
Table or Query: The Table field is enabled. Select the name of the table or query from which responses will be displayed. For example, if you choose Medical Codes, the respondent will choose from a list of medical diagnoses.
Yes/No: when you click Save, the question type changes to Multiple Choice (check box) with Yes and No choices. You can add others, such as N/A.
To auto-populate the response with the user’s previous response to this question (in any questionnaire), select Copy Previous Response. This helps the user to complete the questionnaire more quickly. Auto-populated responses are editable.
If applicable, identify any applicable Legal Requirements related to this question. If a finding is generated as a result of a response, this information is attached to the finding.
Optionally, record a Legal Requirement Popup Message and/or an Advice Popup Message. When this question is added to a questionnaire, there will be an option to Display Advice or Display Legislation.
Optionally, link an Image to the question. An icon will represent the image on the questionnaire. When the end user responding to the questionnaire hovers over the icon, the image will be displayed.
By default, a user has the option to attach documents to their question response; if necessary, change this to Required (the Attach Document button is mandatory) or Not Available (the Attach Document is not displayed).
If necessary, select the Health Center to limit the questionnaire to.
Click Save.